the shop
amanda borders | mystery writer & editor
Quill&Glass
Quill&Glass
amanda riley | mystery writer & editor
writing | Editing | photography
about
editing
blog
contact
resources
shop
menu
writing • editing • photography
March 9, 2015
Ballerina Dreams and An Editing Trick
For the past few weeks, I’ve been slogging through my Lightroom catalog in an attempt to cull, organize, and tag all my images. It’s a big job (understatement of the year), and it doesn’t help that I keep getting derailed when I stumble across images that I had completely forgotten about and now kind of […]

This page may contain
affiliate links. click here
for more information
This page may contain affiliate links. click here for more information
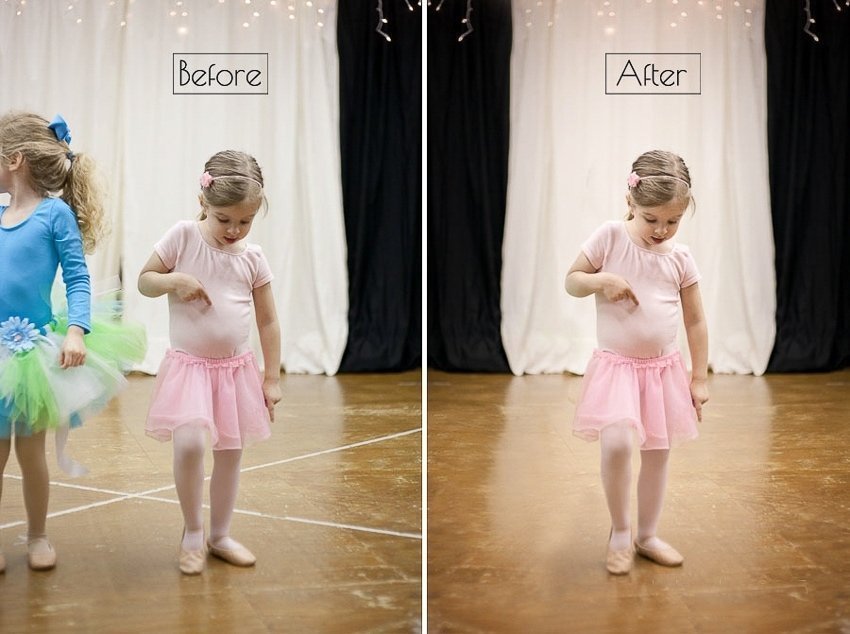
For the past few weeks, I’ve been slogging through my Lightroom catalog in an attempt to cull, organize, and tag all my images. It’s a big job (understatement of the year), and it doesn’t help that I keep getting derailed when I stumble across images that I had completely forgotten about and now kind of love. Like these of my little ballerina at her Christmas studio recital way back in 2011.
I loved the way that she was intently watching the “big girls” as they practiced their recital piece. You could almost see her longing to be one of them as she stood on a chair to boost her up high enough to see through the studio window.

The image on the right especially caught my eye. I loved her little pointed fingers, blurred foot, and the look of concentration on her face. Unfortunately, because this was shot during her performance, she wasn’t up there alone, and if I tried to crop the other little girl out, I ended up with a composition I didn’t like at all. So I decided to try a trick I’ve used a few times here lately. It only works with certain types of backgrounds, such as very out of focus foliage, or in this case, curtains.

I pulled the image into Photoshop and duplicated the background layer (Cmd+J on a Mac). Then I went to the menu and clicked on Edit>Transform>Flip Horizontal.

Now I had a mirror image of the original sitting on top. I added a layer mask and inverted it (Cmd+I) to hide the new layer. Choosing a soft white brush, I painted on the mask to conceal the other girl and reveal the black curtain.

The image was almost where I wanted it to be now. There was just a tiny sliver of tutu still showing, and those taped lines on the floor.
I flattened my layers, added a new blank layer, and used the clone stamp and the spot healing brush tools to get rid of the tutu and lines. (You can use the clone stamp and spot healing brush on a blank layer as long as you have Aligned Sample set to Current and Below in the toolbar. This will help keep your file size down, saving you valuable hard drive space.)

So there you have it—a quick, simple way to turn a snapshot into a printable memory.

Praesent leo risus, sodales sed fermentum vitae, ornare ut metus. Maecenas ornare pellentesque metus a commodo. Lorem ipsum dolor sit amet, consectetur adipiscing elit. Suspendisse sed nibh non nisl finibus imperdiet.
Writing Routine
Tracker
free printable
send me the tracker


