the shop
amanda borders | mystery writer & editor
Quill&Glass
Quill&Glass
amanda riley | mystery writer & editor
writing | Editing | photography
about
editing
blog
contact
resources
shop
menu
writing • editing • photography
read the post
March is here, bringing us springtime weather and all things Irish! Today I’m sharing 6 mysteries with Irish settings that would make perfect St. Patrick’s Day reading.
read the post —
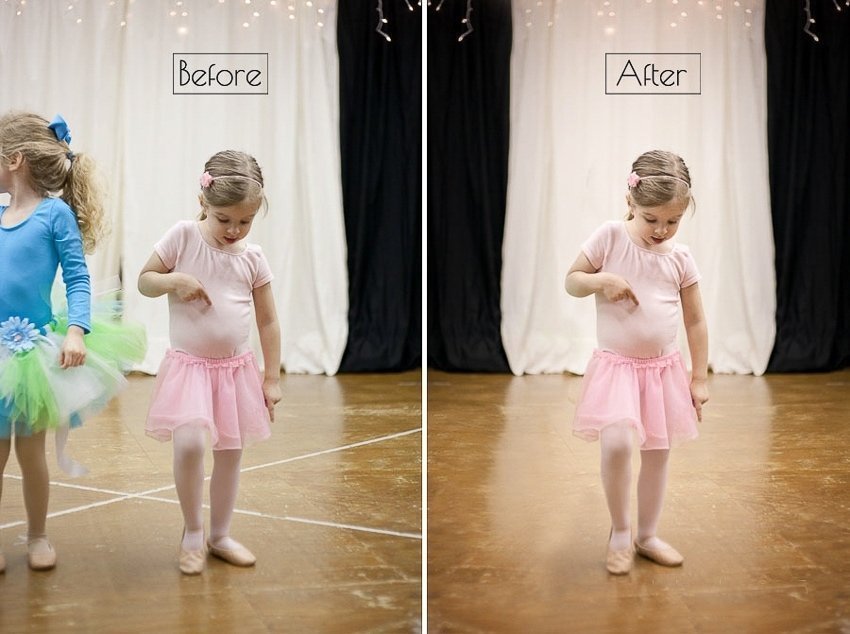
For the past few weeks, I’ve been slogging through my Lightroom catalog in an attempt to cull, organize, and tag all my images. It’s a big job (understatement of the year), and it doesn’t help that I keep getting derailed when I stumble across images that I had completely forgotten about and now kind of love. Like these of my little ballerina at her Christmas studio recital way back in 2011.
I loved the way that she was intently watching the “big girls” as they practiced their recital piece. You could almost see her longing to be one of them as she stood on a chair to boost her up high enough to see through the studio window.

The image on the right especially caught my eye. I loved her little pointed fingers, blurred foot, and the look of concentration on her face. Unfortunately, because this was shot during her performance, she wasn’t up there alone, and if I tried to crop the other little girl out, I ended up with a composition I didn’t like at all. So I decided to try a trick I’ve used a few times here lately. It only works with certain types of backgrounds, such as very out of focus foliage, or in this case, curtains.

I pulled the image into Photoshop and duplicated the background layer (Cmd+J on a Mac). Then I went to the menu and clicked on Edit>Transform>Flip Horizontal.

Now I had a mirror image of the original sitting on top. I added a layer mask and inverted it (Cmd+I) to hide the new layer. Choosing a soft white brush, I painted on the mask to conceal the other girl and reveal the black curtain.

The image was almost where I wanted it to be now. There was just a tiny sliver of tutu still showing, and those taped lines on the floor.
I flattened my layers, added a new blank layer, and used the clone stamp and the spot healing brush tools to get rid of the tutu and lines. (You can use the clone stamp and spot healing brush on a blank layer as long as you have Aligned Sample set to Current and Below in the toolbar. This will help keep your file size down, saving you valuable hard drive space.)

So there you have it—a quick, simple way to turn a snapshot into a printable memory.
read the post —
Photography is all about light. Usually our photographs are lit by sunlight, tungsten bulbs indoors, or flash. This week, our challenge was to look for an alternative source of light to create our weekly photograph. There were some amazing shares on the Clickin Moms forum, using all kinds of light sources—candles, oven and refrigerator lights, sparklers, fireplaces, nightlights . . .
As soon as I read the prompt, I started brainstorming different things around the house that light up. One of the first things that came to mind was my son’s fiber optic lamp. It was an impulse Christmas gift a couple of years ago, after we stumbled upon it at Cracker Barrel. He uses it as a night light, and I first thought that I would use it to light a portrait of him. But, as it turns out, the light that it puts out doesn’t work so well for lighting faces.
Instead, I spent about an hour photographing the lamp itself. One of my favorite things about this lamp is that when you look at it in the dark, you can run your fingers across the surface of it, and the pinpoints of light turn to squiggles. I wanted to catch that in a photograph, but the more I played, the more ways I found to photograph it. It was really very therapeutic and relaxing and I highly recommend it. In fact, I might have to order one for myself. You should, too—for $6.99 on Amazon, it’s the most fun you can have for less than ten bucks! I ended up with a LOT of images of the lamp, and it took me several days to narrow it down and pick one to submit for my P52 post. In the end I chose this one. It reminds me a bit of pictures of the earth from space, a bit of those plasma globes they used to sell in science shops, and even little bit of a brain.

Here are a few of my other favorites. It was so hard to narrow it down! I see rain, exploding stars, nuclear dandelions . . . so much fun and a much-needed creative boost!

Next up on the blog circle is Nancy at Hidden Pines Photography. Go check out her take on Alternative Light. Thanks so much for stopping by!
{Settings for the final photograph were: Canon 5D Mark II,
Canon 24-70 2.8L @ 70 mm | ISO 100 | 1/2 second | f2.8 }
read the post —
Welcome to another round of the On Our Plates food photography blog circle! Be sure to follow the link at the end of this post to see what the other ladies have been cooking up this month.
As you may have heard, we’ve had a little winter weather here in the south. A little over 2 weeks ago, southern Kentucky got a whopping 9 inches of snow in one day. It usually takes us at least a few years to rack up that many inches of snow, so needless to say, we were unprepared. It was days before our neighborhood roads were clear enough to drive on. While it was exciting and fun for the first few days, the fun wore off pretty quickly as the cabin fever set in.
By day 14 we were cheering to see the snow finally washed away by rain. The next day, we got the joyous news that there was another winter storm bearing down on us, bringing with it anywhere from 2 – 12 inches of new sleet and snow, depending on which weather model you choose to put your money on. You know it’s bad when even the kids are moaning, “But I don’t want it to snow again!”
So as I sit here listening for the pouring rain to turn to sleet, then to snow, I am dreaming of spring with these Lemon Poppy Seed Muffins. If you love Starbucks lemon loaf, you will love these muffins.

This is a recipe from the Thibeault’s Table blog that I found on Pinterest (how did I ever find anything new to cook before Pinterest?) and have made several times with a few minor alterations. These are hands down my favorite muffins. The combination of lemon, yogurt, and buttermilk gives them a fresh, tangy flavor that is perfect when you are fighting the winter blahs. I’ve made them both with and without the glaze. I love them either way, but of course, the kids always prefer icing. I used my mom’s lemon pound cake glaze. It is nice and tart and perfect for these muffins.

The recipe makes a dozen regular sized muffins, but they didn’t last long.

Next up in this month’s circle is Emily’s Herb Tomato Bisque. Yum! That sounds perfect for this gloomy weather. Go see what she’s been cooking up and leave her some love. Thanks for stopping by!
LEMON POPPY SEED MUFFINS

Deliciously moist and lemony, these tender muffins are perfect for a spring day (or a cold winter day that has you longing for spring.) Adapted from Thibeault's Table
Muffins:
- 2 C All-purpose flour ((I like White Lily))
- 1 tsp Baking powder
- 1/2 tsp Salt
- 1/4 tsp Baking soda
- 1/2 C Full-fat Greek yogurt ((I use Greek Gods Traditional Yogurt))
- 1/2 C Whole buttermilk ((I said they were delicious, not healthy!))
- 2 Tbsp Fresh lemon juice*
- 1 C Sugar
- 1/2 Cup Butter (softened)
- Zest of 1 lemon
- 2 Large eggs
- 2 tsp Poppy seeds
Glaze:
- Powdered sugar
- Fresh lemon juice*
Preheat oven to 350° & grease a muffin pan (or be lazy like me & use cupcake liners!)
Whisk together dry ingredients & set aside.
Mix yogurt, buttermilk, & lemon juice until smooth & set aside.
In an electric mixer, cream butter, sugar, & lemon zest until light & fluffy.
Add eggs 1 at a time & beat until thoroughly combined.
Add about a third of the flour mixture, followed by about half of the yogurt mixture. Alternate adding the rest, & mix until just blended.
Stir in poppy seeds, then divide into muffin cups.
Bake at 350° for about 20 minutes, or until a toothpick inserted into the center muffin comes out clean. These muffins come out a very pale golden color, so trust me & check them with a toothpick at 20 minutes, even if they don’t look done, they probably are. I overcooked them the first time I made them, & it really makes a difference in how tender they are.
While muffins cool, measure about a cup of powdered sugar into a mixing cup & add lemon juice, a tablespoon at a time. How much juice you add will depend on how thick you want your glaze to be. I kept mine fairly thick so I could drizzle it with a fork. If you want more glaze on your muffins, you could also make it a little thinner & dip the muffin tops directly into it.
- Enjoy!
*I’m not going to go all food snob on you and say that only fresh, organic, locally harvested lemons will do. While I did use fresh lemon juice this time, I have made these with bottled lemon juice and they are really just as good. Just don’t tell Martha I said that.
read the post —
This week’s P52 prompt was Low Light. To shoot in low light, you have to choose whether to use a longer shutter speed or to raise your ISO. My first inclination was to drag out my tripod and do some longer exposures, either of city lights or stars. But . . . February. Yeah, we are in the midst of a full-blown Arctic blast here in Kentucky. We still have the majority of our freak foot-deep snowfall on the ground, so going outside hasn’t really been on my list of things I’m willing to do. Going outside at night? Not gonna happen. Once the sun goes down, I’m huddled under a blanket on the couch with a glass of wine and Friends on Netflix. Instead, I ended up breaking my rule that each week’s photo has to be shot that week, specifically for that week’s prompt.
For the past couple of weeks, I’ve been working on a big spring cleaning project. No buckets and mops are involved, though, because what I’ve been cleaning is my computer. I started out by consolidating all my media files (photos, videos, and music) on the new EHD I got for Christmas. I’ve always stored most of my photos on an external, but over the years, things have drifted, and I realized when I started this project that the iTunes library I thought was on the external was actually on my iMac hard drive.
Once everything was shifted to the EHD, I started in on my Lightroom catalog. This is the year. The year that I sort through 50,000 LR files to cull the shots that need to go and sort, tag, and print the keepers. Because my kids are the proverbial shoemakers’ children. We have very few prints of them since I made the switch to digital when my daughter was born. This article really hit home with me. I don’t want my kids to lose out on images of their childhood because I was too lazy to print them.
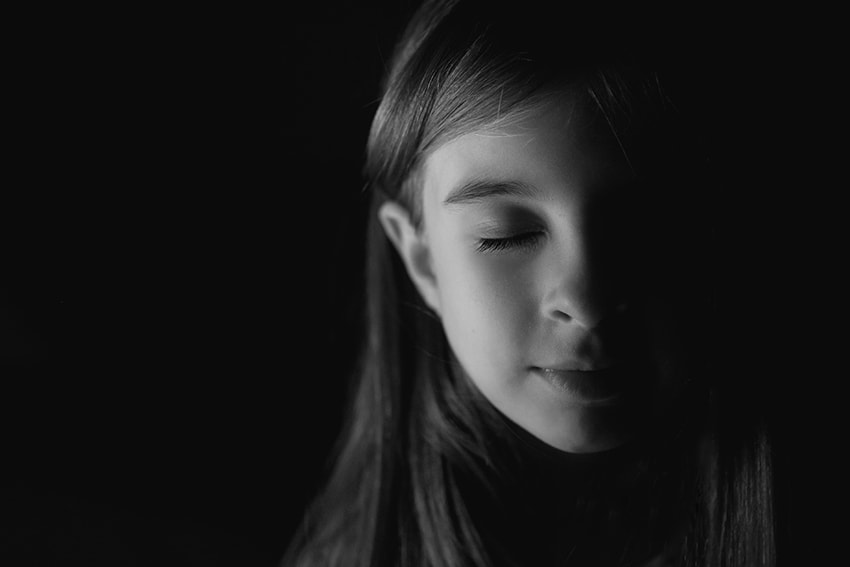
While working my way through my image catalog, I’m coming across a lot of shots that I didn’t really like at first glance, but that I find I really love when I see them with fresh eyes. This shot of my daughter is from a couple of weeks ago, when I was working on the sidelighting exercise for this P52. It wasn’t the look I was going for, so I passed it by in favor of this shot. But, when I was scrolling through my images this week, it really caught my eye.
This image was shot by the light of her little bedside lamp, which is very dim. I love the way the light wraps around her face and accentuates the shape of it. Because the light was so dim and I exposed for her the bright side of her face, everything else fell away to black. For some reason it reminds me of the Beatles. Was there an album cover or something of their faces shot this way? No idea. So here it is, my P52 Low Light shot for this week . . .

Want to see more interpretations of Low Light? Next up in this week’s circle is Jude at From My Side of the Lens. Go check out her post and leave her some love. Thanks for stopping by!
read the post —
It’s P52 time again! This week’s prompt was Backlighting. I love the beautiful glow of backlit summer portraits, but that wasn’t going to happen this week, with a foot of snow on the ground and a mix of gloomy clouds and harsh winter sun. Luckily, there are several other ways you can go with backlighting. Silhouettes and backlit food photography were two of the first ideas that came to mind. But then the kids and I went to spend the weekend with my parents.
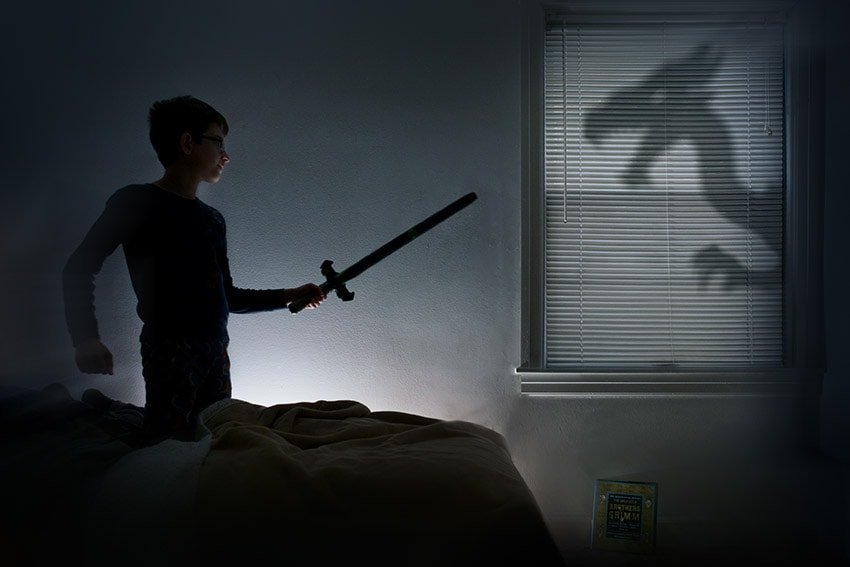
Am I the only one who gets totally creeped out whenever I sleep away from home? Even at my parents’ house, I can’t shake the heebie-jeebies, especially since I’m usually the last one to go to bed there. The window in my room was backlit by a security light, and I lay there for a long time one night imagining all the sinister shadows that might slide across that window. Seriously, I’m worse than a child.
But then the idea for this image popped into my mind. I had been playing with toy photography that night, and one of the toys I had photographed was my old Fisher Price castle dragon. He wasn’t nearly impressive enough to pull this off, but I was pretty sure we had a Lego dragon at home that would be perfect. I even managed to talk Mr. I Hate Pictures into helping me out with it, but only by promising a five-minute shoot followed by Jello.
This is a composite of four shots—a shot of the Lego dragon (I believe this is Smaug from a Hobbit set, if you were wondering), a shot of the blinds backlit by the afternoon sun (because our neighborhood security lights don’t light the blinds enough), a shot of my son backlit by a nightlight, and a free texture from From the Treetop Photography.

If you want to check out some more interpretations of Backlighting, continue on around our blog circle. Next up this week is Trish at Autumn Leaves Photography.
read the post —
This week’s P52 prompt was Directional Light. While technically all light has direction, photographically speaking, lighting that falls evenly over the face of your subject is called flat lighting. Often used in fashion photography, so-called beauty lighting is flat and minimizes texture (ie wrinkles, pores, and blemishes). This week we were supposed to implement side lighting, which emphasizes shape and texture. Things like weathered barn wood and the skin of an orange can look really cool when sidelit. I’ve also seen some gorgeous portraits of elderly people that use side lighting to emphasize the wrinkles that we usually try to hide. In photography, it is important to learn how to use light so that you are emphasizing what is important in your image while downplaying what you want to go unnoticed.
I first thought of using side lighting to highlight something with texture, but ended up with an idea for a nighttime portrait lit by a lamp, with the rest of the room falling into blackness. With my kids, I find myself tending to favor flat (safe) lighting. While I didn’t get exactly the result I was going for with this picture, since I need a brighter lamp or my Speedlight to force the rest of the room into darkness, I do love the moodier shadows I got with this type of light. I definitely need to step out of my box and start shooting more challenging lighting situations.

Just for fun, here is an example of what I mean by letting the rest of the room fall to black. This is one of my daughter’s ponies hanging out at my parents’ house last weekend. It was dark and all the lights were out in the house except the lamp on the end table. I set the pony on the floor a couple of feet away from the table, but well within the circle of light cast by the lamp, and exposed for the pony’s “skin.” (Fur? Whatever.) With the pony correctly exposed, everything outside the circle of light fell into blackness. (Google the inverse square law of light if you want to see the why of this little photography technique. It was math-y rules like this that scared me to death when I first started studying photography, but once you figure out how to put them into practice, they aren’t so scary, I promise.)

A lot of photographers use their garages to make gorgeous portraits with black backgrounds like this, and I’m dying to try it after we have our big yard sale and can actually get into our garage again.
Next up on the blog circle this week is Kate, go check out her post and leave her some love. Thanks for stopping by!
{Shot with 5D Mark III, Canon 24-70
@70 mm, ISO 1600, f3.2 @ 1/160
bedside table lamp as light source}
I am a lifelong lover of stories, an avid mystery reader, a mom, a grammar geek, a photographer, a writer, and a freelance editor.
There is nothing I enjoy more than getting lost in a good story, except maybe helping other writers refine their stories so that their readers get lost in them.
Want to know more?
mystery writer & editor
I’m Amanda
Get to know me
hello there!
Praesent leo risus, sodales sed fermentum vitae, ornare ut metus. Maecenas ornare pellentesque metus a commodo. Lorem ipsum dolor sit amet, consectetur adipiscing elit. Suspendisse sed nibh non nisl finibus imperdiet.
Writing Routine
Tracker
free printable
send me the tracker

